If you are unaware of CSS, it is a style sheet language. That means It allows you to add styling and let you present beautiful web pages. CSS allows you to add colours, fonts, borders to your web page, i.e. style your web page. To beautify html elements, we have to apply css to them. To apply css to any element we have to first select it. This article will discuss CSS selector, one of the core concepts of learning CSS, so let's begin.
The first requirement towards learning the style sheet language CSS is to get familiar with selectors and how they work? Selectors are what allows you to target specific HTML elements and apply the style to them. You can understand CSS selectors like this. Your task is to add font-size 12px to one of four paragraphs in a website, then how are you going to select that particular element? To apply font size to the first paras, we have to target that element. We do so with CSS selectors. The intention behind writing this blog is to teach those who are absolute beginners in CSS. You will surely learn about CSS selectors after that.
There are several type of selector in CSS. But, here in this blog we are only going to learn basic selector to start your css game. I'm not going into depth beacause it can make you overwhwlmwd with css.
- 1. ID Selector
- 2. Tag Selector
- 3. Class Selector
- 4. Universal selector
- 5. Attribute Selector
Before diving deep into how these selectors work. Can you answer this? How we are going to select the first p element from the HTML document. Don't feel bad if you don't know how to do it. That's ok! You will learn over time.
<!-- First element -->
<p class = "first_para">Will It Matches</p>

<!-- Second element -->
<p class = "second_para">Will It Matches</p>

<!-- Third element -->
<p class = "third_para">Will It Matches</p>

<!-- Fourth element -->
<p class = "fourth_para">Will It Matches</p>
We will select the first para like this.
 .first_para {
     font-size: 16px;
 }
We selected the first paragraph with the class name "first_para". Then I applied a font-size property to it. For a beginner, this might be a bit confusing. Let me first go through how CSS selectors works, then we will deep dive into CSS Selectors one by one. I have made a CSS selectors quiz for you. If you want to improve your CSS selector knowledge, then you should try this quiz.
How Selectors Work In CSS?
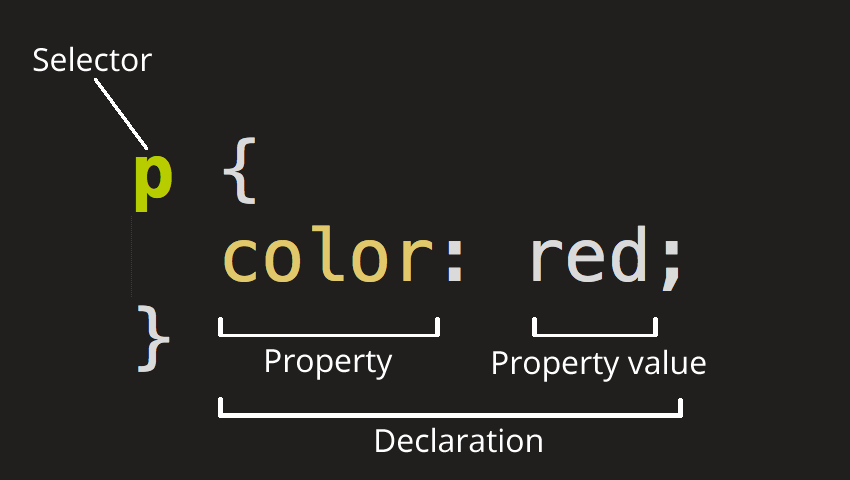
The above picture shows the basic css rule for applying styling. Step one start from HTML, where we define various tags. Then in the CSS rule, we define two things. One is a CSS selector and, the other is a CSS declaration inside curly braces. CSS selector finds all the p elements in the document. Then we declare various CSS style declarations. These are value property pairs used to define styling on the element matched by the CSS selector. Now, after selecting all the p elements this css rule indicates to apply red color to all p tags. Now understand each Selectors one by one. Let's start with the ID selector.
ID Selector
Syntax
#id_value { style properties }
As you can see in the syntax above, we are selecting an element with id by appending # character before id attribute value in CSS. We do so because it tells CSS to look for an element that has an id followed by it.
As you can see in the code block below, we have four elements. In the CSS file, we are choosing elements with id "matches". It picks all the elements with id matches. And, applies a color blue. But, always remember that id must be unique.
<!-- Selected -->
<p id="matches">Will Matches</p>

<!-- Not Selected -->
<div>

  <p id="not-matches">Will It Matches</p>

</div>

<!-- Selected -->
<p id="matches" >Will It Matches</p>

<!-- Not Selected -->
<p id="not-matches">Will It Matches</p>
 #matches {
     color: blue;
 }
The CSS ID selector matches an element based on the value of the element id attribute. For the element to be selected, its id attribute must match exactly the value given in the selector. This is because, css selectors are case sensitive so they must match element names and attribute values exactly. ID selectors rank on top in terms of specificity. It means that they can override other selectors styles. We can't change the style set with the id selector.
Type Selector
Syntax
element { style properties }
To select an element with a type name write the HTML tag name directly in your CSS file and apply the desired styling to it.
As you can see in the code block below to select an h1 tag we can write h1 directly in the CSS file and apply styling to it.
<!-- First element -->
<h1 id="matches">Hello World!</h1>

<!-- second element -->
<header>

  <h2>Will It Matches</h2>

</header>

<!-- Third element -->
<p id="matches">Will It Matches</p>

<!-- Fourth element -->
<h1 id="not-matches">Will It Matches</h1>
 h1{
     color: black;
 }
The CSS tag selector selects all elements of the given type within a document. One thing to keep in mind is that they are least specific. It’s means they can't override other selector styling, it's better to use class selector.
Class Selector
Syntax
.class_name { style properties }
To select a element with class you have to use . (period) character before class attribute value in CSS. Similar to id selector where we use # character instruct css language to look for a element with that class in documnet.
You can see below how we are selecting element with class selector. We are selecting elements with class will match and applying color to black. We can also add more than one class to a single element. But, this is not possible with id selctor.
<!-- First element -->
<h1 class="will-match">Hello World!h1>

<!-- second element -->
<aside>

  <h2 class="will-notmatch" >Will It Matches</h2>

</aside>

<!-- Third element -->
<p class="will-match matches para_class" >/p>

<!-- Fourth element -->
<div class="will-notmatch" >Will It Matches</div>
 .will-match{
     color: black;
 }
The CSS class selector matches elements based on the value of their class attribute. Class selectors are best way to select elements. They are probably the most useful and versatile selectors out there.
We can add multiple classes to a single element with a space separated. They rank well in specificity and I recommond you to use this selector.
While naming class values or id values don't start it with number. Don't add space between a class value.
Universal Selector
Syntax
* { style properties }
By writing * character in CSS, we can select all the elements in CSS. This is called universal selector.
if inside universal selector you have defined the color to be blue, then it will apply color to every element on a web page.
<!-- First element -->
<h1 class="will-match">HeWorld!h1>

<!-- second element -->
<aside>

  <h2 class="will-notmatch" >Will It Matches</h2>

</aside>

<!-- Third element -->
<p class="will-match matches para_class" >/p>

<!-- Fourth element -->
<div class="will-notmatch" >Will It Matches</div>
 * {
     color: pink;
 }
The CSS universal selector (*) matches elements of any type. It is also known as wildcard selector.
Attribute Selector
Syntax
[attr=value] { style properties }
To select an element with attribute write attributename=attributevalue inside square brackett([]) in CSS. Square brackett instruct css language to look for an attribute in the documnet.
As you an see below we are selcting attribute data-model with value yes. Css selelcts all elements that have similar attribute.
<!-- First element -->
<h1 data-model="yes">HeWorld!h1>

<!-- second element -->
<aside>

  <div data-model = "no" >It Will Not Match</div>

</aside>

<!-- Third element -->
<p data-model >/ No Value p>

<!-- Fourth element -->
<div data-model = "yes" >Will It Matches</div>
 [data-model = "yes"] {
     color: green;
 }
The CSS attribute selector matches elements based on the presence or value of a given attribute. Attribute selector have same specificity as of class selector. They look little bit tricky to understand but useful though. But in some old version browser they are not supported. Attribute selector offers a lot of other ways to selct element. you can read it here.